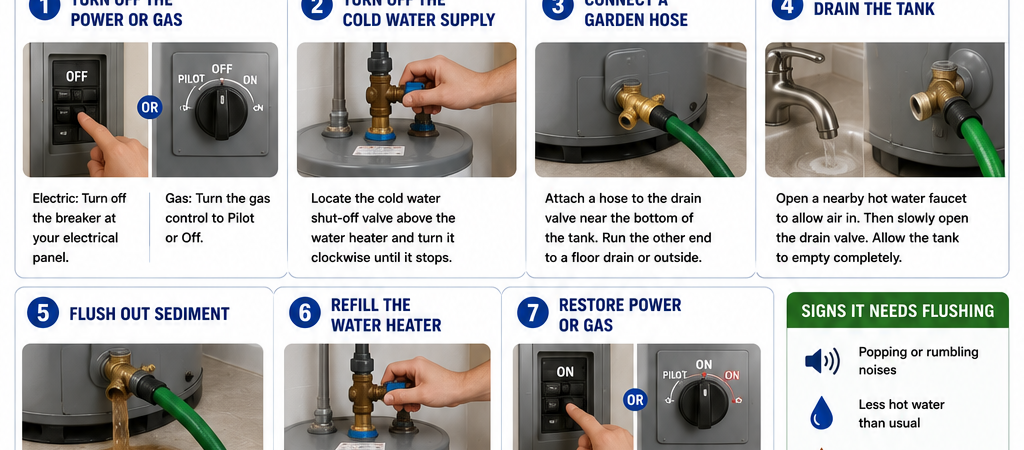
Flushing your water heater is one of the easiest maintenance tasks you can perform to improve efficiency and extend the life of your system. Over time, minerals and sediment settle at the bottom of the tank, making the water heater work harder and increasing energy costs.
Most homeowners can flush a traditional tank water heater in less than an hour using a few basic tools.
Why Should You Flush Your Water Heater?
Sediment buildup can lead to:
- Higher energy bills
- Reduced hot water capacity
- Rumbling or popping noises
- Shorter water heater lifespan
- Poor heating performance
Regular flushing helps keep your water heater running efficiently.
How Often Should You Flush It?
Most manufacturers recommend flushing a traditional tank water heater:
- Once a year for normal water conditions
- Every 6 months if you have hard water
Routine maintenance helps prevent sediment from hardening inside the tank.
What You’ll Need
Before you begin, gather:
- Garden hose
- Bucket (optional)
- Flathead screwdriver (for some drain valves)
- Gloves
- Towels
Step 1: Turn Off the Power or Gas
For electric water heaters:
- Turn off the breaker at your electrical panel.
For gas water heaters:
- Turn the gas control to Pilot or Off.
Always allow the water to cool slightly before draining.
Step 2: Turn Off the Cold Water Supply
Locate the cold water shut-off valve above the water heater.
Turn it clockwise until it stops.
Step 3: Connect a Garden Hose
Attach a garden hose to the drain valve near the bottom of the tank.
Run the other end to:
- A floor drain
- A driveway
- An outdoor area where hot water can safely drain
Step 4: Drain the Tank
Open a nearby hot water faucet to allow air into the system.
Then slowly open the drain valve.
Allow the tank to empty completely.
Step 5: Flush Out Sediment
Turn the cold water supply back on for several short bursts while the drain valve remains open.
This helps stir up and wash out any remaining sediment inside the tank.
Continue until the water runs clear.
Step 6: Refill the Water Heater
Close the drain valve.
Remove the garden hose.
Turn the cold water supply fully back on.
Leave a hot water faucet open until water flows smoothly without air sputtering.
Step 7: Restore Power or Gas
Once the tank is completely full:
- Turn the circuit breaker back on for electric units.
- Relight the pilot or return the gas control to On if needed.
Never restore power to an empty electric water heater because it can damage the heating elements.
Signs Your Water Heater Needs Flushing
Your water heater may need maintenance if you notice:
- Popping or rumbling noises
- Less hot water than usual
- Rust-colored water
- Higher utility bills
- Slow water heating
When Should You Call a Professional?
Call a licensed plumber if:
- The drain valve won’t open.
- Water won’t drain from the tank.
- You notice leaks.
- The pressure relief valve is leaking.
- You’re uncomfortable performing the maintenance yourself.
Frequently Asked Questions
Can flushing a water heater improve efficiency?
Yes. Removing sediment allows the burner or heating elements to heat water more effectively, which can lower energy costs.
What happens if I never flush my water heater?
Sediment buildup can reduce efficiency, create strange noises, shorten the unit’s lifespan, and eventually lead to costly repairs.
Is flushing a water heater difficult?
Most homeowners with basic DIY experience can flush a traditional tank water heater safely by following the proper steps.
Final Thoughts
Flushing your water heater is simple preventive maintenance that can improve performance, reduce energy bills, and extend the life of your equipment.
By removing sediment once a year—or more often if you have hard water—you’ll help ensure a steady supply of hot water while reducing unnecessary wear on your system.